
Quick3DCloset Guide: How to Create a Wardrobe in Quick3DCloset Step by Step
🎯 Objective
Learn how to create, configure, and customize a wardrobe in Quick3DCloset, from the initial selection to the final saving.
1. Add a Closet
Once you have created the room architecture:
- Go to the Furnishing tab
- Select Add closet

✔️ This will open the creation wizard.
2. Template manager
A window called Template Manager will open, showing the available closet types based on the door style.
🚪 Usual options
- Sliding doors
- Swinging doors
- No doors


💡 In this example
- Swinging doors
- Overlay swing-out doors with plinth
✔️ Select this template and click the Accept button.
3. Catalogue Selection
After choosing the closet template, a pop-up window called Catalogues will open, where you can configure the closet.

⚙️ From here you can modify:
- General dimensions of the wardrobe
- Width, height, and depth
- Number of modules
- Types of moldings
- The door series
- Initial setup
💡 In this example
- Finish panel: Side panel
- Top moulding: Overlay swing doors – Model 1
- Bottom moulding: Overlay swing doors
- Side moulding (left and right): Model 1
✔️ It is the structural base of the wardrobe.
3.1. Finishes
The paintbrush icon inside Libraries opens the Finishes menu.

🎨 It allows you to change materials for:
- Interior: Back panel, Interior, Plinth, and Tracks
- Mouldings: Moldings, Upper Molding, and Lower Molding
- Finish panel: Lateral: Profile
💡 How to change the material or finish
- Select one or more elements from the Interior, Mouldings, or Finish panel
- Select a ‘material group‘ from the list in the lower-left corner
- Choose the material you want to apply to the selected elements in [1]
- Click the ‘Apply material to selected objects‘ button to change the material

✔️ In this example, we will assign the ‘Beech 01‘ material to all elements.
4. Door Configuration
When you click Next, you will access the Doors tab.

🚪 Here you can customize:
- Number of doors
- Door configuration
- Door model
- Handles
- Hinges
- Finishes

💡 Specific finishes can also be applied.
5. Structure Configuration
In the Structure tab, you can modify the inside of the wardrobe, meaning you can adjust the structure of the wardrobe modules.

🧱 Main options:
- Adjust module dimensions
- Create internal divisions
- Add an top cabinet module to the wardrobe
- Create special cut-outs for beams, columns, etc
✔️ Very useful for adapting the wardrobe to the actual space.
6. Auto Distribution elements
The Auto Distribution window allows you to automatically insert interior templates.

📦 Distribution examples
- Bars + shelves
- Drawers
- Mixed modules
- Standard combinations
✔️ You can use templates from the program or create your own.
7. Distribution elements
If you prefer full control, use the Distribution window.

You can add manually:
- Dividers and strips
- Shelves
- Rods/Pull out
- Drawers
- Drawer sets
- Other drawrs
- Interior doors
- Closet accessories
- Decoration (clothes, coats, skirts, trousers, etc.)
7.1. Example: Add a shelf
- Select Shelves in the ‘Type of objects‘ section
- Choose the module where you want to place it
- Use Add or double-click


Possible configuration
- Number of shelves
- Initial height
- Spacing between shelves
- Shelves material
7.2. Example: Add drawers sets
- Select Drawer sets
- Choose the ‘drawer unit type‘
- Choose the destination module


Available settings
- Drawer type
- Number of drawers
- Vertical distribution
- Hardware quantity
7.3. Command bar
In the Distribution window, the following icons appear in the top toolbar:

🛠️ Functions
Delete: Select an element and click Delete to remove it
Move: Use the Up or Down buttons to change its position
Finishes: Change the materials of selected elements
Edit: Modify a selected element
ON / OFF: Choose which elements are visible
View: Adjust the view angle of the closet preview
Print: Save the preview image as a PDF by clicking the Print button
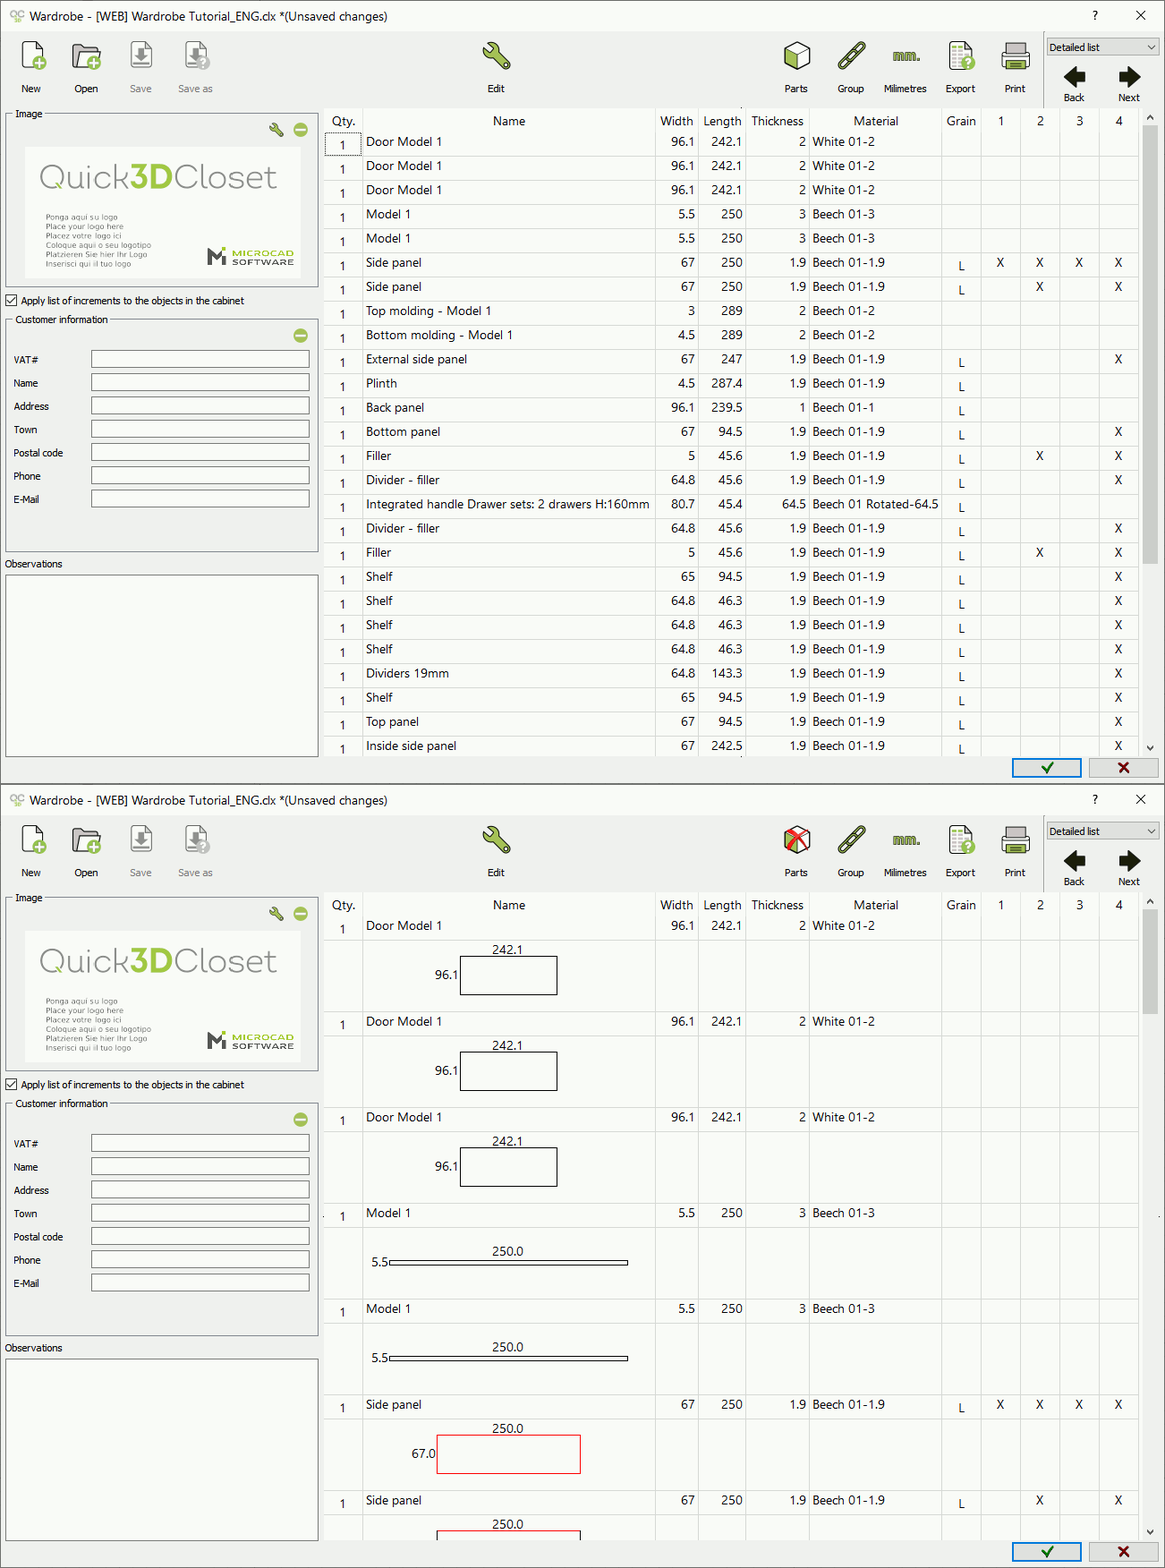
8. Detailed list
The Detailed List window displays technical information about the wardrobe.

📋 Parts
- Exploded view of the closet components
- Individual pieces
📊 Export
- Excel
- CSV
- Different cutting optimization formats: Ardis, Biesse, Cutlist Plus 2006, Eurosoft, Magi-Cut, Ms Excel, Opticut, Optimik, Optimik 3.xx, Usuario and Woodge.
9. Prices
In the Prices window, the wardrobe quote is shown based on the configuration selected in all the previous steps.

💰 Available options
- It is possible to configure the prices of each part of the wardrobe
- You can configure the price list, the order of the fields, add currency, etc
- Export to Excel
- Print the price list
10. Final view
This is the final view of the closet. It is shown with the doors hidden, allowing you to clearly see the interior layout.

✔️ Ideal for checking the interior layout.
11. Save a wardrobe
Quick3DCloset allows you to save custom closets so you can reuse them later.

How to do it
- Press Save
- Assign a name
- Click OK

✔️ It will be available for future projects.
12. Add a previously saved wardrobe

- Go to Furnishing > Add closet
- Select any template
- In Catalogues, click Open
- Choose the stored wardrobe
- Click OK to open it
💡 Best practices
✔️ Make sure to define the measurements properly before arranging the interior
✔️ Use the Automatic distribution to save time
✔️ Manually customize premium projects
✔️ Save frequently used models as your own templates.
✔️ Review prices before finalizing the proposal
✅ Expected result
- Fully customized wardrobe
- Professional and reusable design
- Optimized interior
- Budget ready for the client